The One UI 3.0 based on Android 11 is the next big OS update to the One UI (custom Android skin) running on Samsung devices.
Several Samsung flagships, including the Galaxy S20 series, Galaxy Note 20 series, and previous year flagships such as the Galaxy S10 series, are already part of the One UI 3.0 beta program. Meanwhile, Samsung Galaxy S20 version devices have started receiving the One UI 3.0 stable update in the US.
Until now, Samsung hasn’t officially announced a One UI 3.0 update timeline or a list of devices that will get the update. Regardless, an official One UI 3.0 rollout schedule has surfaced online via the Samsung Members app on devices in Egypt.
The list most likely pertains to Samsung users in Egypt. Still, Samsung global users can figure out a rough estimate of when the One UI 3.0 update will be arriving on their device.
One UI 3.0 Supported Device List And Rollout Schedule
December 2020
Galaxy S20
Galaxy S20+
Galaxy S20 Ultra
January 2021
Galaxy S10
Galaxy S10+
Galaxy S10 Lite
Galaxy Note 10
Galaxy Note 10+
Galaxy Note 20
Galaxy Note 20 Ultra
Galaxy Z Flip
Galaxy Z Fold 2
February 2021
Galaxy Fold
March 2021
Galaxy M21
Galaxy M30s
Galaxy M31
Galaxy A51
Galaxy Note 10 Lite
Galaxy Tab S7
April 2021
Galaxy A50
Galaxy M51
May 2021
Galaxy A21s
Galaxy A31
Galaxy A70
Galaxy A71
Galaxy A80
Galaxy Tab S6
Galaxy Tab S6 Lite
June 2021
Galaxy A01-Core
Galaxy A01
Galaxy A11
Galaxy M11
Galaxy Tab A
July 2021
Galaxy A30
Galaxy Tab S5e
August 2021:
Galaxy A10
Galaxy A10s
Galaxy A20
Galaxy A20s
Galaxy A30s
Galaxy Tab A 10.1
Galaxy Tab Active Pro
September 2021
Galaxy Tab A8 (2019)
It goes without saying that the Galaxy S21, which is scheduled for release next month, will come with the One UI 3.0 out-of-the-box. Interestingly, the One UI 3.0 rollout will continue until September 2021, according to Samsung, a month after the expected release of Android 12.
Note that Samsung mentions “preparing in” instead of “rolling out” next to every device in the list. In other words, these are tentative One UI 3.0 release dates.
Kia Seltos is one of the hottest sub-compact SUVs on the market right now. It’s one of the most popular and stylish SUVs, and people want to know about it. Considering that, we have brought you an owner review of 2020 Kia Seltos.
Recently, a YouTuber posted an owner’s review of the Kia Seltos on his channel. The YouTuber interviewed Mr. Jassi, who owns Kia Seltos HTK+ diesel variant. It’s a 2020 model and has been driven around 2000 km so far.
The owner explained everything, including the pros and cons of the car. He also explained why he chose Kia Seltos over Hyundai Creta. So, without any further ado, let’s move forward.
The owner said he wanted to have a sub-compact SUV due to its utility, ground clearance, and comfort. In this segment, Kia Seltos is one of the most sporty looking and feature-loaded cars. It’s one of the primary reasons he preferred Kia Seltos over its rival Hyundai Creta.
Appealing Appearance
He said Kia Seltos looks more elegant, stylish, refreshing, and a sportier car. In contrast, the new Hyundai Creta looks a bit dull and sophisticated. He said in terms of appearance, the previous generation Creta was much better.
Image: A2Y Cardrive
On the other hand, he dropped the idea of buying MG Hector as it was going considerably above his budget.
The owner said he lives in Bhopal and the mid-spec variant (Kia Seltos HTK+) cost him Rs 15.20 lakhs (on-road). On contrary, the base model MG Hector costs around Rs 16.60 lakhs (on-road).
The HTK+ variant comes with features like 16-inch alloy wheels, a smart key with push-button start, LED DRLs, cruise control, LED mood lights, and much more.
Apart from this, the owner discussed other matters as well like ride quality, fuel-efficiency and service feedback.
Smooth Power Delivery
A 1.5-liter BS6 compliant diesel engine powers Kia Seltos Diesel. In terms of figures, it can produce around 113 BHP and 250 Nm of torque. According to its owner, the engine is quite powerful and provides blistering acceleration.
Furthermore, one of the most impressive qualities of Kia Seltos is its smooth power delivery and ride quality. Usually, the diesel engines are noisy and not as refined as petrol engines. However, as per Mr. Jassi, the diesel variant produces significantly lower noises. He said the ride quality and power delivery is so smooth you’ll feel like it’s a gasoline car.
Kia Seltos Diesel Real World Mileage
As per its owner, Kia Seltos delivers around 14-15 km/l mileage in the city and 18-19 km/l on the highway. However, the owner was told by the technicians at the service center that its fuel efficiency will further improve after its first oil change which is generally done after 6,000 km.
Nevertheless, the initial stage mileage is still impressive considering the segment.
Impressive Service Quality
Image: A2Y Cardrive
In the video, Mr. Jassi gave positive feedback about the service of Kia Motors. The owner was higly impressed by the attitude, behavior, and punctuality of the employees and the manager of the service center.
Although service quality varies from center to center, it’s still a good sign considering Kia is a new brand in India.
Problems Faced
The alignment of the car was improper; however, the company fixed it as soon as the owner reported it
Faulty infotainment system: there was a problem with Bluetooth connectivity
The owner said he was quite disappointed when Kia Seltos scored three stars safety rating in Global NCAP. It’s quite disappointing when there are cheaper cars like Tata Altroz, Tata Tiago, and a few others that hold a better safety rating.
It seems that most of the glitches that were encountered in the car seem more like defects that can be fixed. However, one of the major concerns for buyers would be the average safety rating of Kia Seltos.
Anyway, what do you guys think? Share your views in the comments section below.
Budgie is a feature-rich, modern desktop developed by Solus Project, which also comes under our list of best Linux desktop environment.
After more than a year of development, the Solus project has released a new version of its flagship desktop environment, Budgie 10.5.2. The latest iteration of the Budgie desktop includes several new features and bug fixes.
Budgie 10.5.2: What’s New?
Starting with the most important update, this is the first release of Budgie desktop that introduces a new desktop icon implementation.
Nautilus file manager has already removed their desktop icons support long ago, but Budgie used its old version to support the functionality. Hence, Solus dev team has created a new, separate project to facilitate desktop icon support independently.
Budgie Desktop View
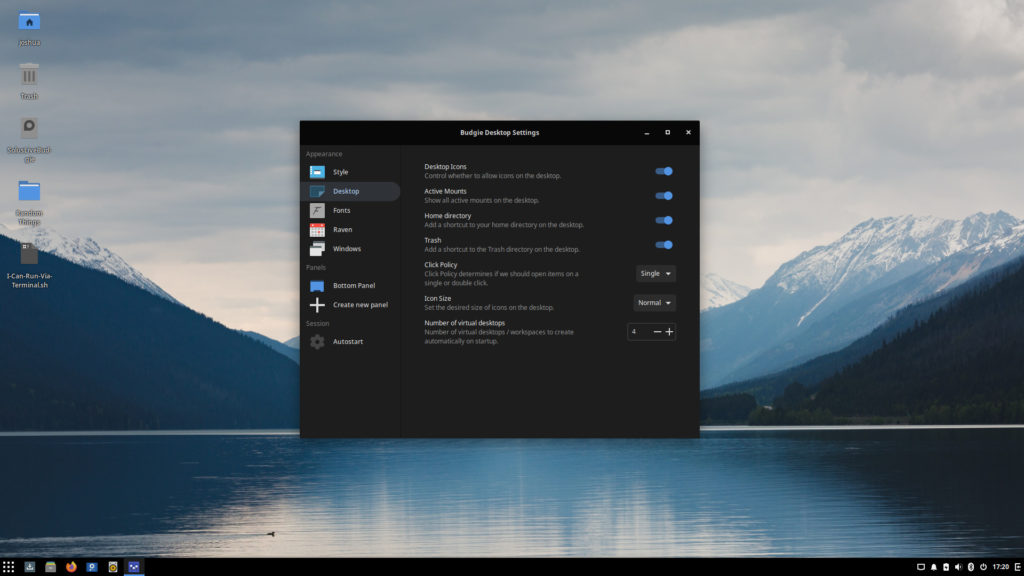
The project named Budgie Desktop View is now the official Budgie desktop icons application/implementation. It provides several functionalities such as options to enable and access “special” folders like Home or Trash and options for opening a file using the default app or via the Terminal.
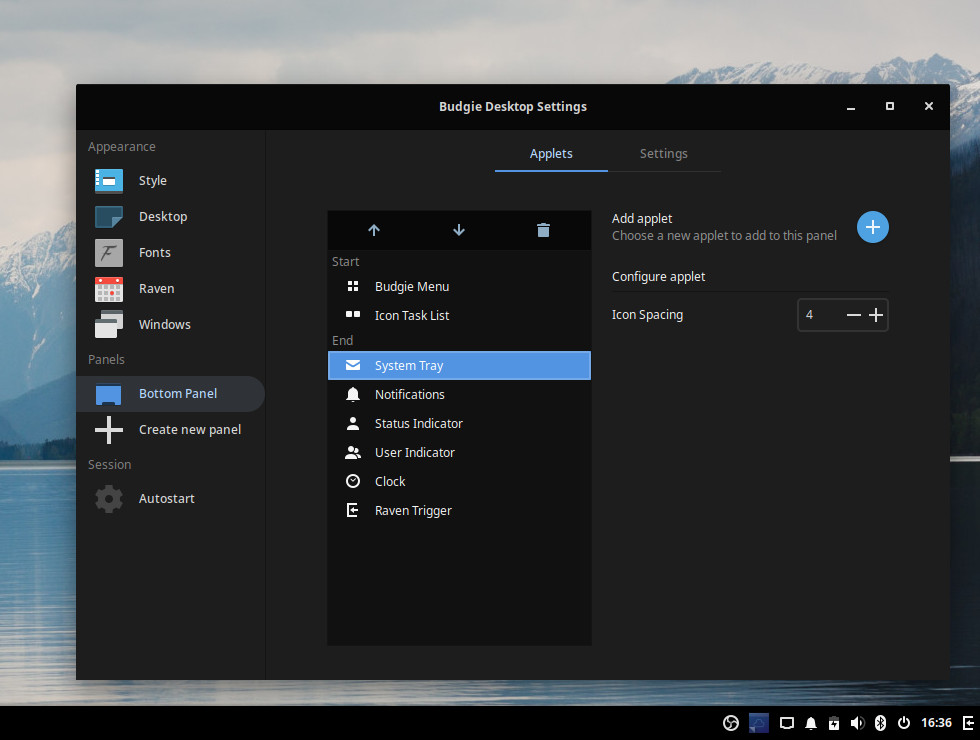
Moving on to the desktop components, v10.5.2 now has a rewritten version (from scratch) of the System Tray to resolve several issues and support tray icons using the XEmbed Protocol.
Budgie 10.5.2 — System Tray
Additionally, the System Tray contains a new configuration option that allows you to manage the space setting between individual icons or applets and tray icons.
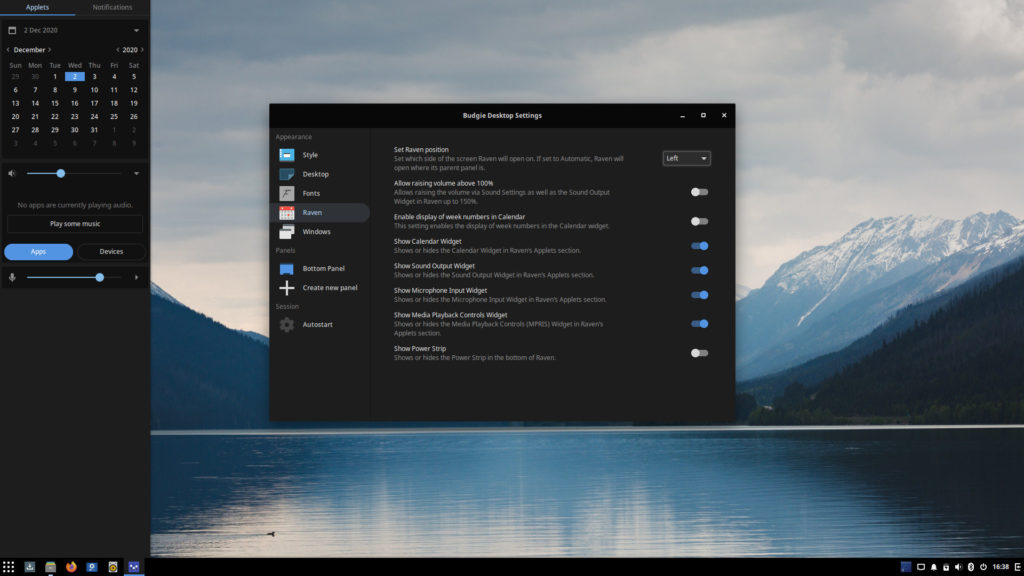
Another config option that Budgie 10.5.2 has added is for choosing the position of the Raven panel. Instead of limiting to the main panel position, you now have full control to decide which side of the screen (auto, left, right) Raven should be on.
Raven (on Left)
As this year’s two iterations of GNOME desktop environment (3.36 and 3.38) arrived, Budgie desktop version 10.5.2 supports both GNOME stack, including libmutter-6 and libmutter-7.
Among other changes, here’s what Budgie version 10.5.2 includes:
Redesigned Sound applet with a dedicated button for mute toggling
Support for three new languages: Afrikaans, Albanian, and Hindi
Option to disable background transitions and workspace switching
Support for transparency in background images
A dedicated button for removing a panel
Behavior refinements for Icon Tasklist applet
Finally, if you’re using Solus operating system, Budgie 10.5.2 has already been shipped to the stable repository. For installation on other Linux distros, the official tarballs are available to download from here.
Undoubtedly, Grand Theft Auto San Andreas is one of the best open-world games. Developed by Rockstar, GTA San Andreas is still played by millions of players worldwide. Of course, the video game is still alive because there is so much you can do in San Andreas. However, the main reason why millions of players still enjoy GTA San Andreas is because of amazing game mods.
You can find several GTA SA mods that add a refreshing element to the game. For instance, through mods, you can play as Iron Man, Hulk, and other superhero characters in San Andreas. Other than that, you can enhance the graphics of San Andreas to make it look like GTA 5. Like that, there are thousands of amazing San Andreas mods you can try. And to make it easy for you to choose, we’ve listed down the 7 best GTA San Andreas mods. So, without wasting any more time, let’s get it started.
Best GTA San Andreas Mods
S.No
Best GTA San Andreas Mods (2020)
1
Gravity Gun Mod
2
GTA SA IV LOS Santos
3
First-Person View Mod
4
Parkour Mod
5
Overdose Effects
6
Cheat Menu Mod
7
GTA SA – V Graphics ENB
1. Gravity Gun Mod
GTA San Andreas Gravity Gun mod
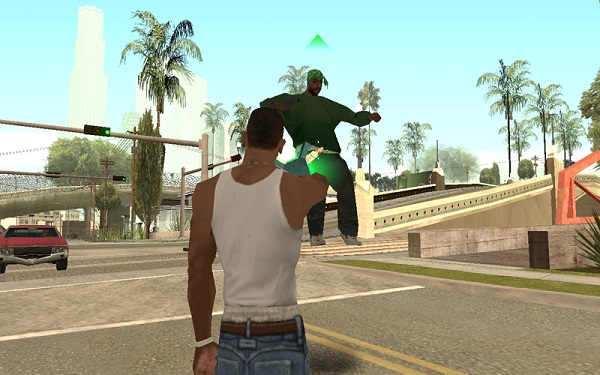
Do you want to pull people towards you and then throw them far away from you? Well, this GTA San Andreas mod lets you do exactly that. After you install the Gravity Gun Mod, our beloved Carl Johnson gets one more weapon in his arsenal, the ‘Gravity Gun.’
Interestingly, using the ‘Gravity Gun,’ you can pull anything, including Non-Playable Characters (NPCs), vehicles, and traffic lights. Then, you can throw them anywhere you like. To be honest, the feeling of seeing NPCs screaming and begging for mercy is unlike anything else.
Also, messing up with NPCs is everything GTA is about. So, you could say that Gravity Gun Mode is one of the best GTA San Andreas mods you can try out today.
When compared to games that are out today, GTA San Andreas does look outdated. The only reason people are still playing San Andreas is that there is so much to explore in Los Santos. However, what if there’s a GTA SA mod that re-textures the graphics of San Andreas to make it go head to head with GTA IV. Well, that’s ‘GTA SA IV Los Santos’ mod for you in a nutshell.
In short, this GTA SA mod replaces original Los Santos textures with the textures from GTA IV. It is one of those GTA SA mods that takes the game’s graphics to a whole another level. So, if you’re tired of playing Rockstar’s most-famous title in outdated graphics, then maybe, you should try out this GTA San Andreas mod.
There’s no point in denying the fact that we all want to experience the brilliance of GTA San Andreas in a first-person view. Originally, the game was only available in a third-person view. However, thanks to the people working on several GTA San Andreas mods, one of those SA mods allows us to play the entire game in the First-person view.
By installing this GTA mod, you can observe everything in Los Santos more closely. Moreover, using weapons in San Andreas gets more fun when you are playing the game in first-person.
In real life, not many of us could do backflips. However, it’s very much possible for us to insane backflips and handstands in GTA San Andreas’ all thanks to GTA SA Parkour mod.
The Parkour Mod V.2.0.4 allows you to perform a total of 65 tricks in the game, including back handspring, full twist, webster, cork, and a lot more. In short, you can literally stop traffic in the streets of Los Santos by performing incredible acrobatic skills.
Who knows, maybe after using GTA San Andreas mods like these, you’ll be motivated to learn these tricks in real life as well.
When Rockstar released GTA San Andreas, the graphics and in-game effects were actually good. However, for today, you can say that everything seems underwhelming. Well, that’s where San Andreas mods such as ‘Overdose Effects V1.5’ comes into the equation.
Surprisingly, the Overdose effects mod enhance visuals of blasts, water, sky, sparks, smoke, fire, etc. In short, the HD quality effects because of this GTA SA mod will compel you to use RPG on hundreds of vehicles.
If you’ve played GTA San Andreas, then you probably know how important it gets to remember all useful cheat codes. However, unlike GTA Vice City, cheats for GTA San Andreas are extremely hard to remember. That’s why players generally Google cheat codes while playing the game.
Well, if you’re tired of this practice and want to use Cheat codes with just a single click, then the GTA SA Cheat Menu mod is here for you.
After installing this mod in GTA San Andreas, you get the Cheat Menu on your game screen. You have to select the cheat you want to use by clicking on it. In short, you won’t have to type the cheat code manually.
So, you could say that this is one of those GTA San Andreas mods that saves a lot of your time while also making things easier for you.
It is of the best GTA San Andreas mods you can download in 2020. Several GTA SA mods claim to improve the graphics of the game; however, only a few of them do the job without breaking your system. Well, fortunately, the GTA SA- V Graphics ENB mod works without any problem.
If upgrading the San Andreas graphics with GTA IV textures isn’t enough, you can go one step ahead and enhance the visuals with GTA 5 textures. After installing this mode, everything in Los Santos will seem more realistic.
So, if you are thinking of going back to playing San Andreas in 2020, then GTA SA-V Graphics is the best San Andreas you can try.
That’s it; those were the best 7 GTA San Andreas mods you can install to enhance your experience in 2020. Of course, there are other mods for the game, but we’ve mentioned only the best ones in this list. Nevertheless, we’ll keep updating this list whenever we find a worthy GTA SA mod on the internet.
“Isn’t that photo too plain?” “That would look would superb in monochrome!” “That’s definitely not the natural color.” Some of the things you can say about photographs with Instagram filters. You can use them to make your photos and videos come to life and add more pep to them.
There are different filters for posts and completely different ones for stories, reels, IGTV, and Live. Here, we’re going to tell you how to use Instagram filters and add more finish to your Instagram posts and stories.
What Are Instagram Filters?
Examples of Instagram Effects
There’s a thin line between filters and effects and we’ll talk about that first. Instagram filters are combinations of different contrast, brightness, and sharpness settings to change the look of your picture and videos. Effects, on the other hand, are powered by augmented reality and let you add objects to your videos and photos.
Another difference is that filters can be applied after you’ve taken a shot, but effects are applied in real-time so you can see what you’re capturing. Simply put, Monochrome and Sepia are filters, but Starburst and Starry Night are effects. You can use Instagram filters in the posts and effects in stories and everything else. So let’s get started with how to use Instagram filters.
How To Use Instagram Filters?
It’s easy to use Instagram filters on your IG posts. With filters, you can highlight certain aspects of the image, make it look brighter, darker, more colorful, or even monochrome. Here’s how you get started with the filters
Click or Select a Photo/Video
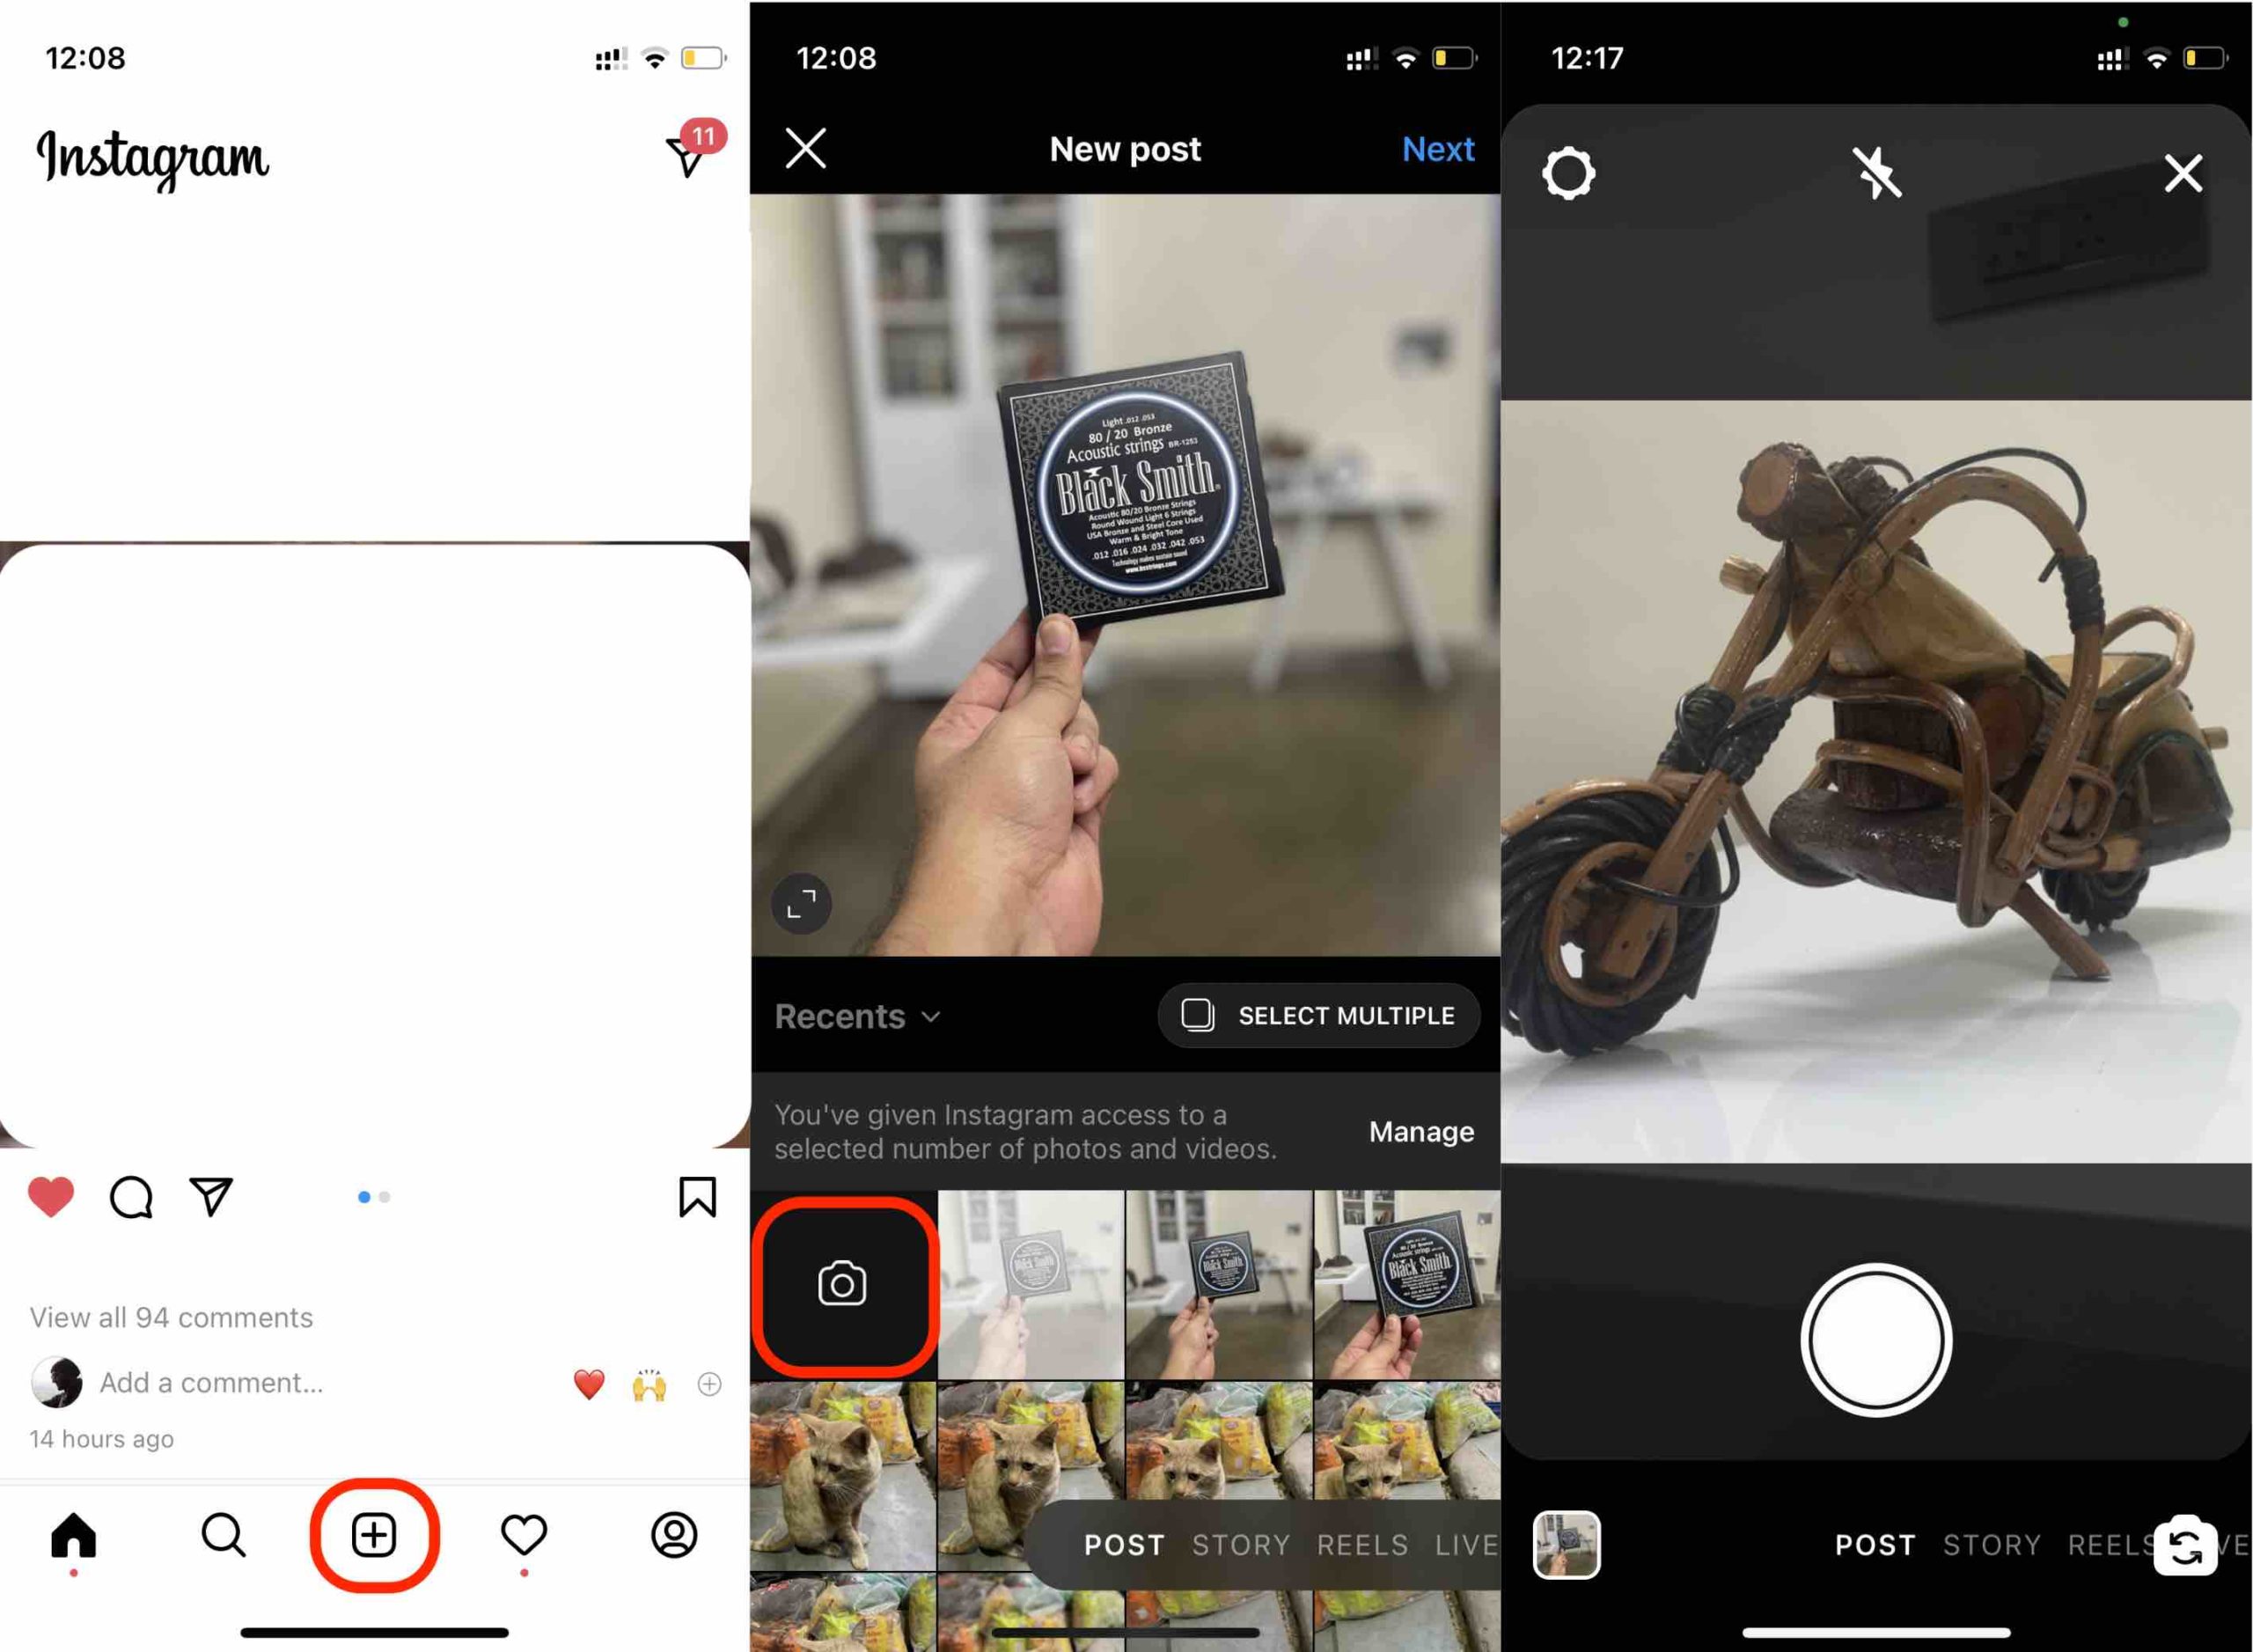
You can add a new post to Instagram by tapping on the ‘+’ icon at the bottom of the app. From here, you can either select an image/video from your photos or tap on the camera icon to take a new photo or video.
Select a filter and set intensity
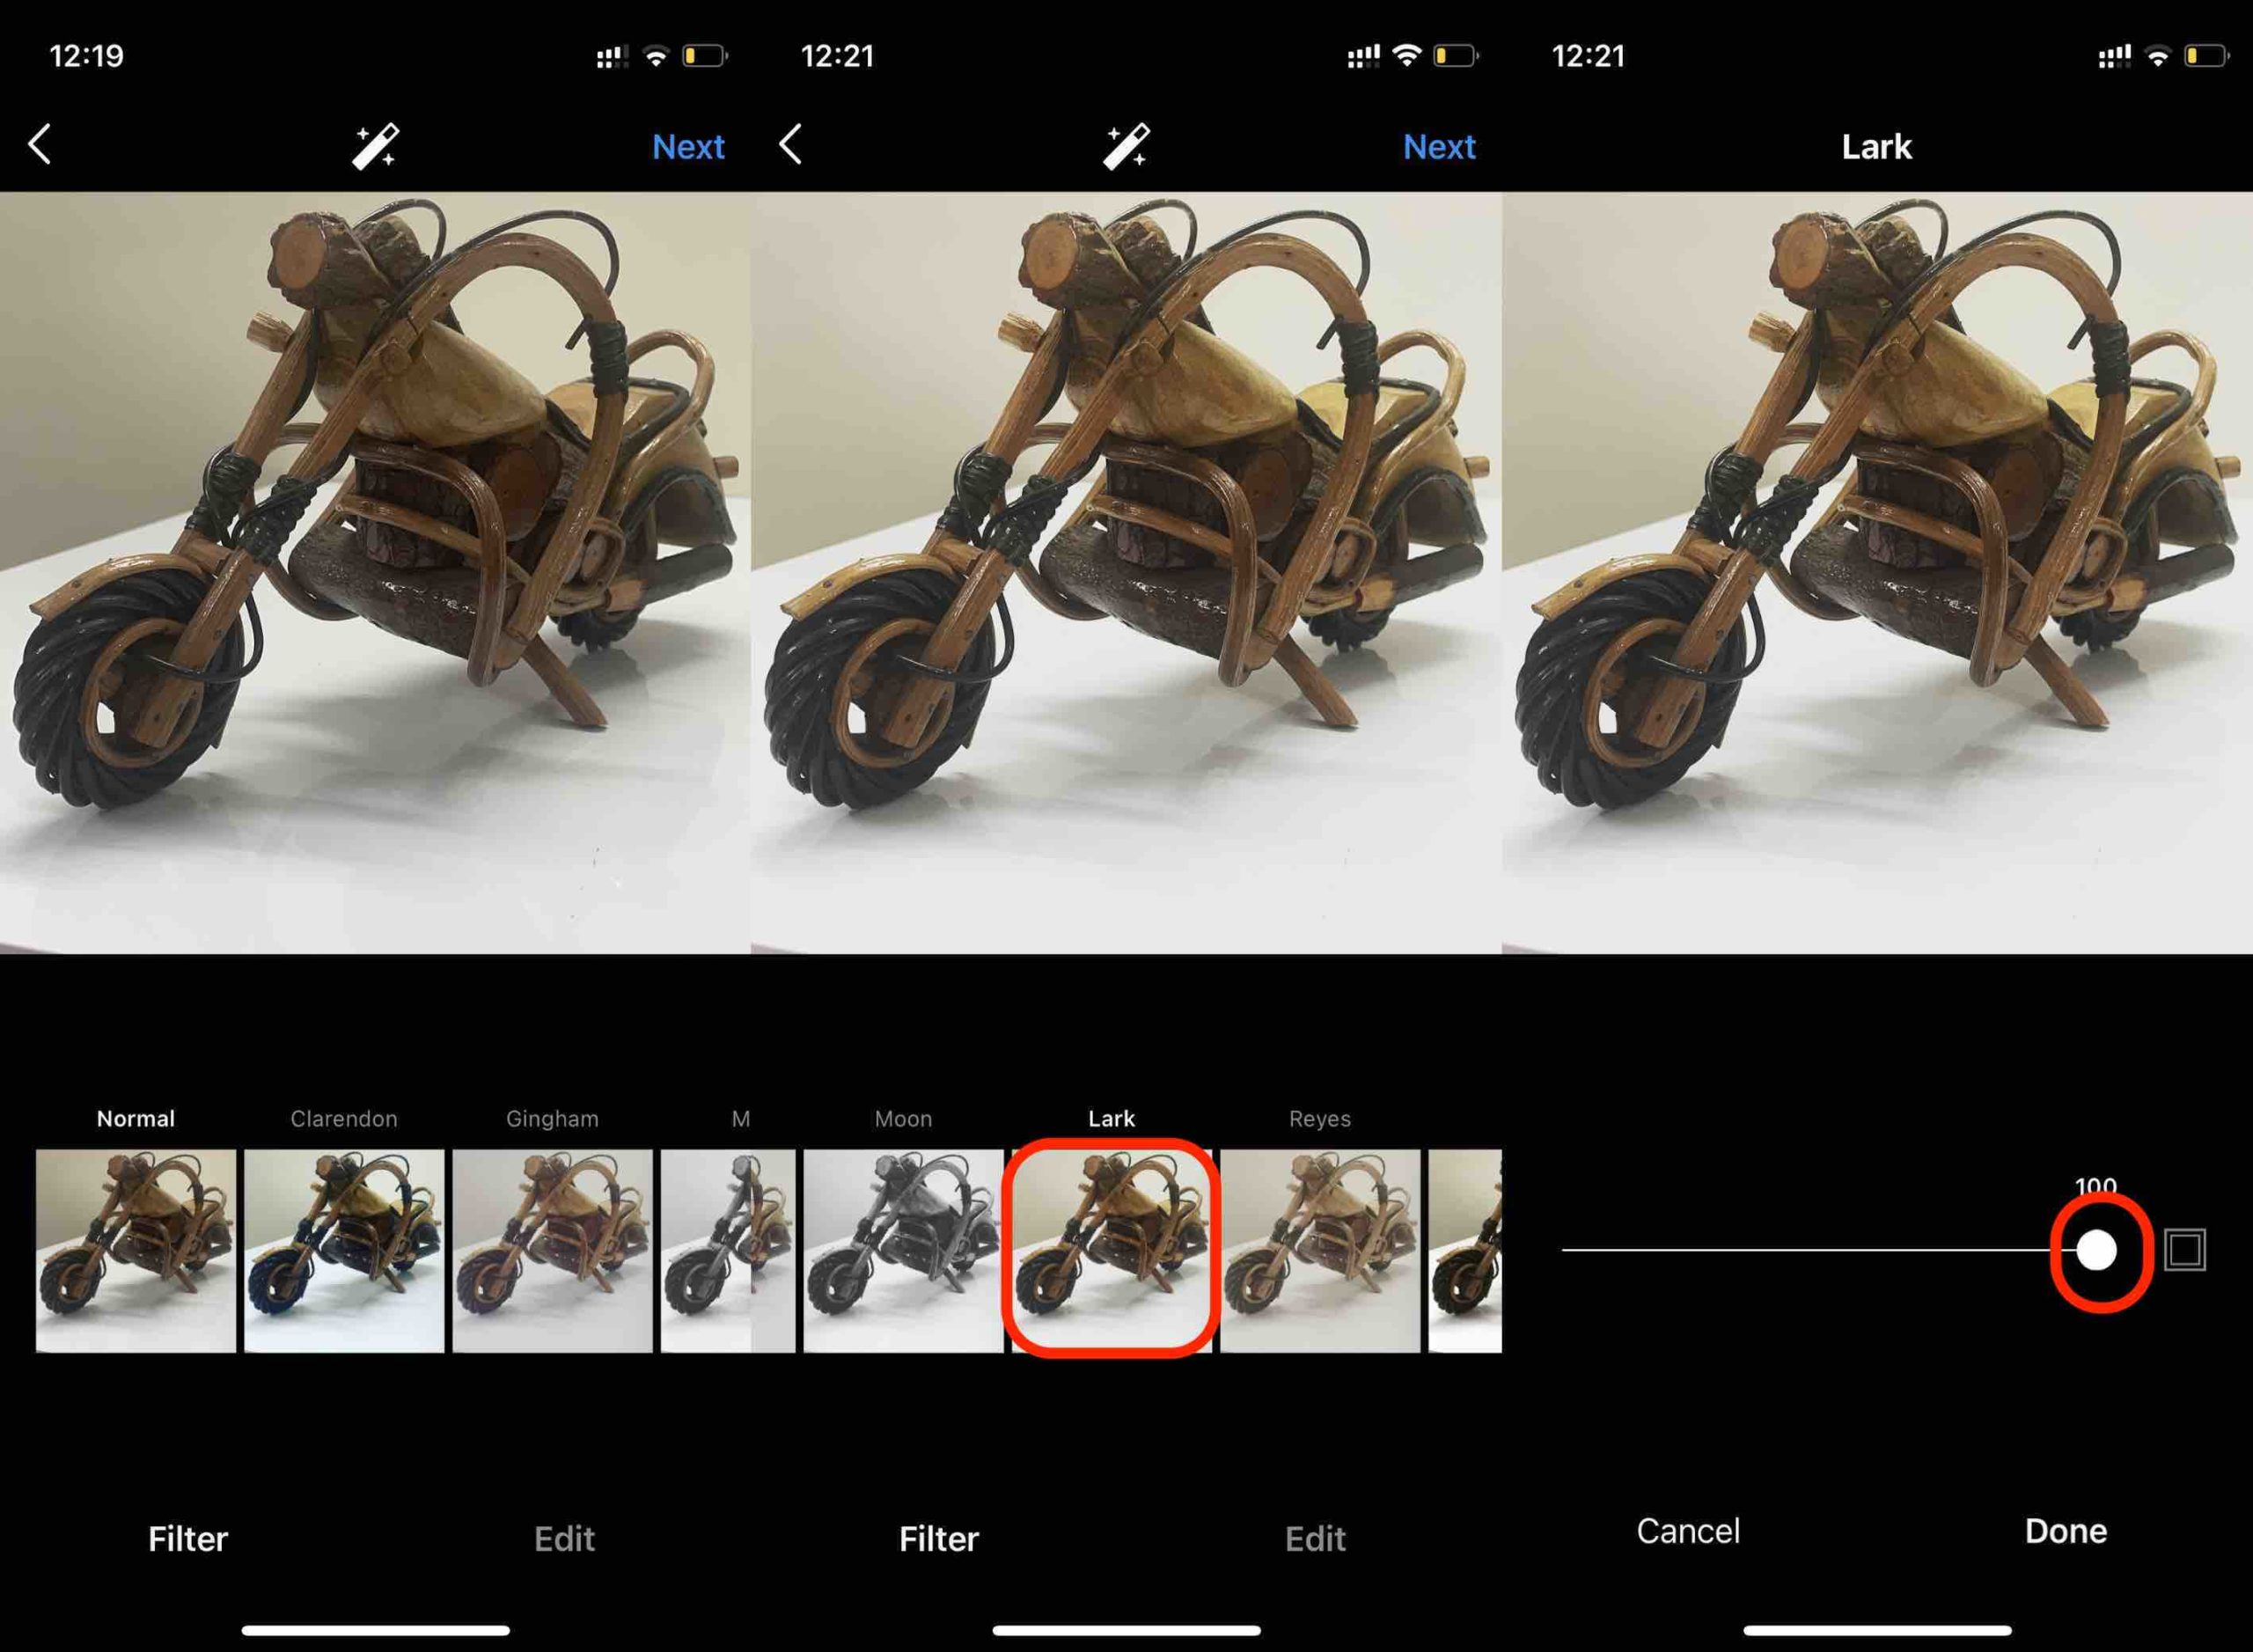
When you click a new image or select one from your photos, you’ll see various filters. Click on a filter once to apply it to the image. Click again to adjust its intensity.
Explore before you choose
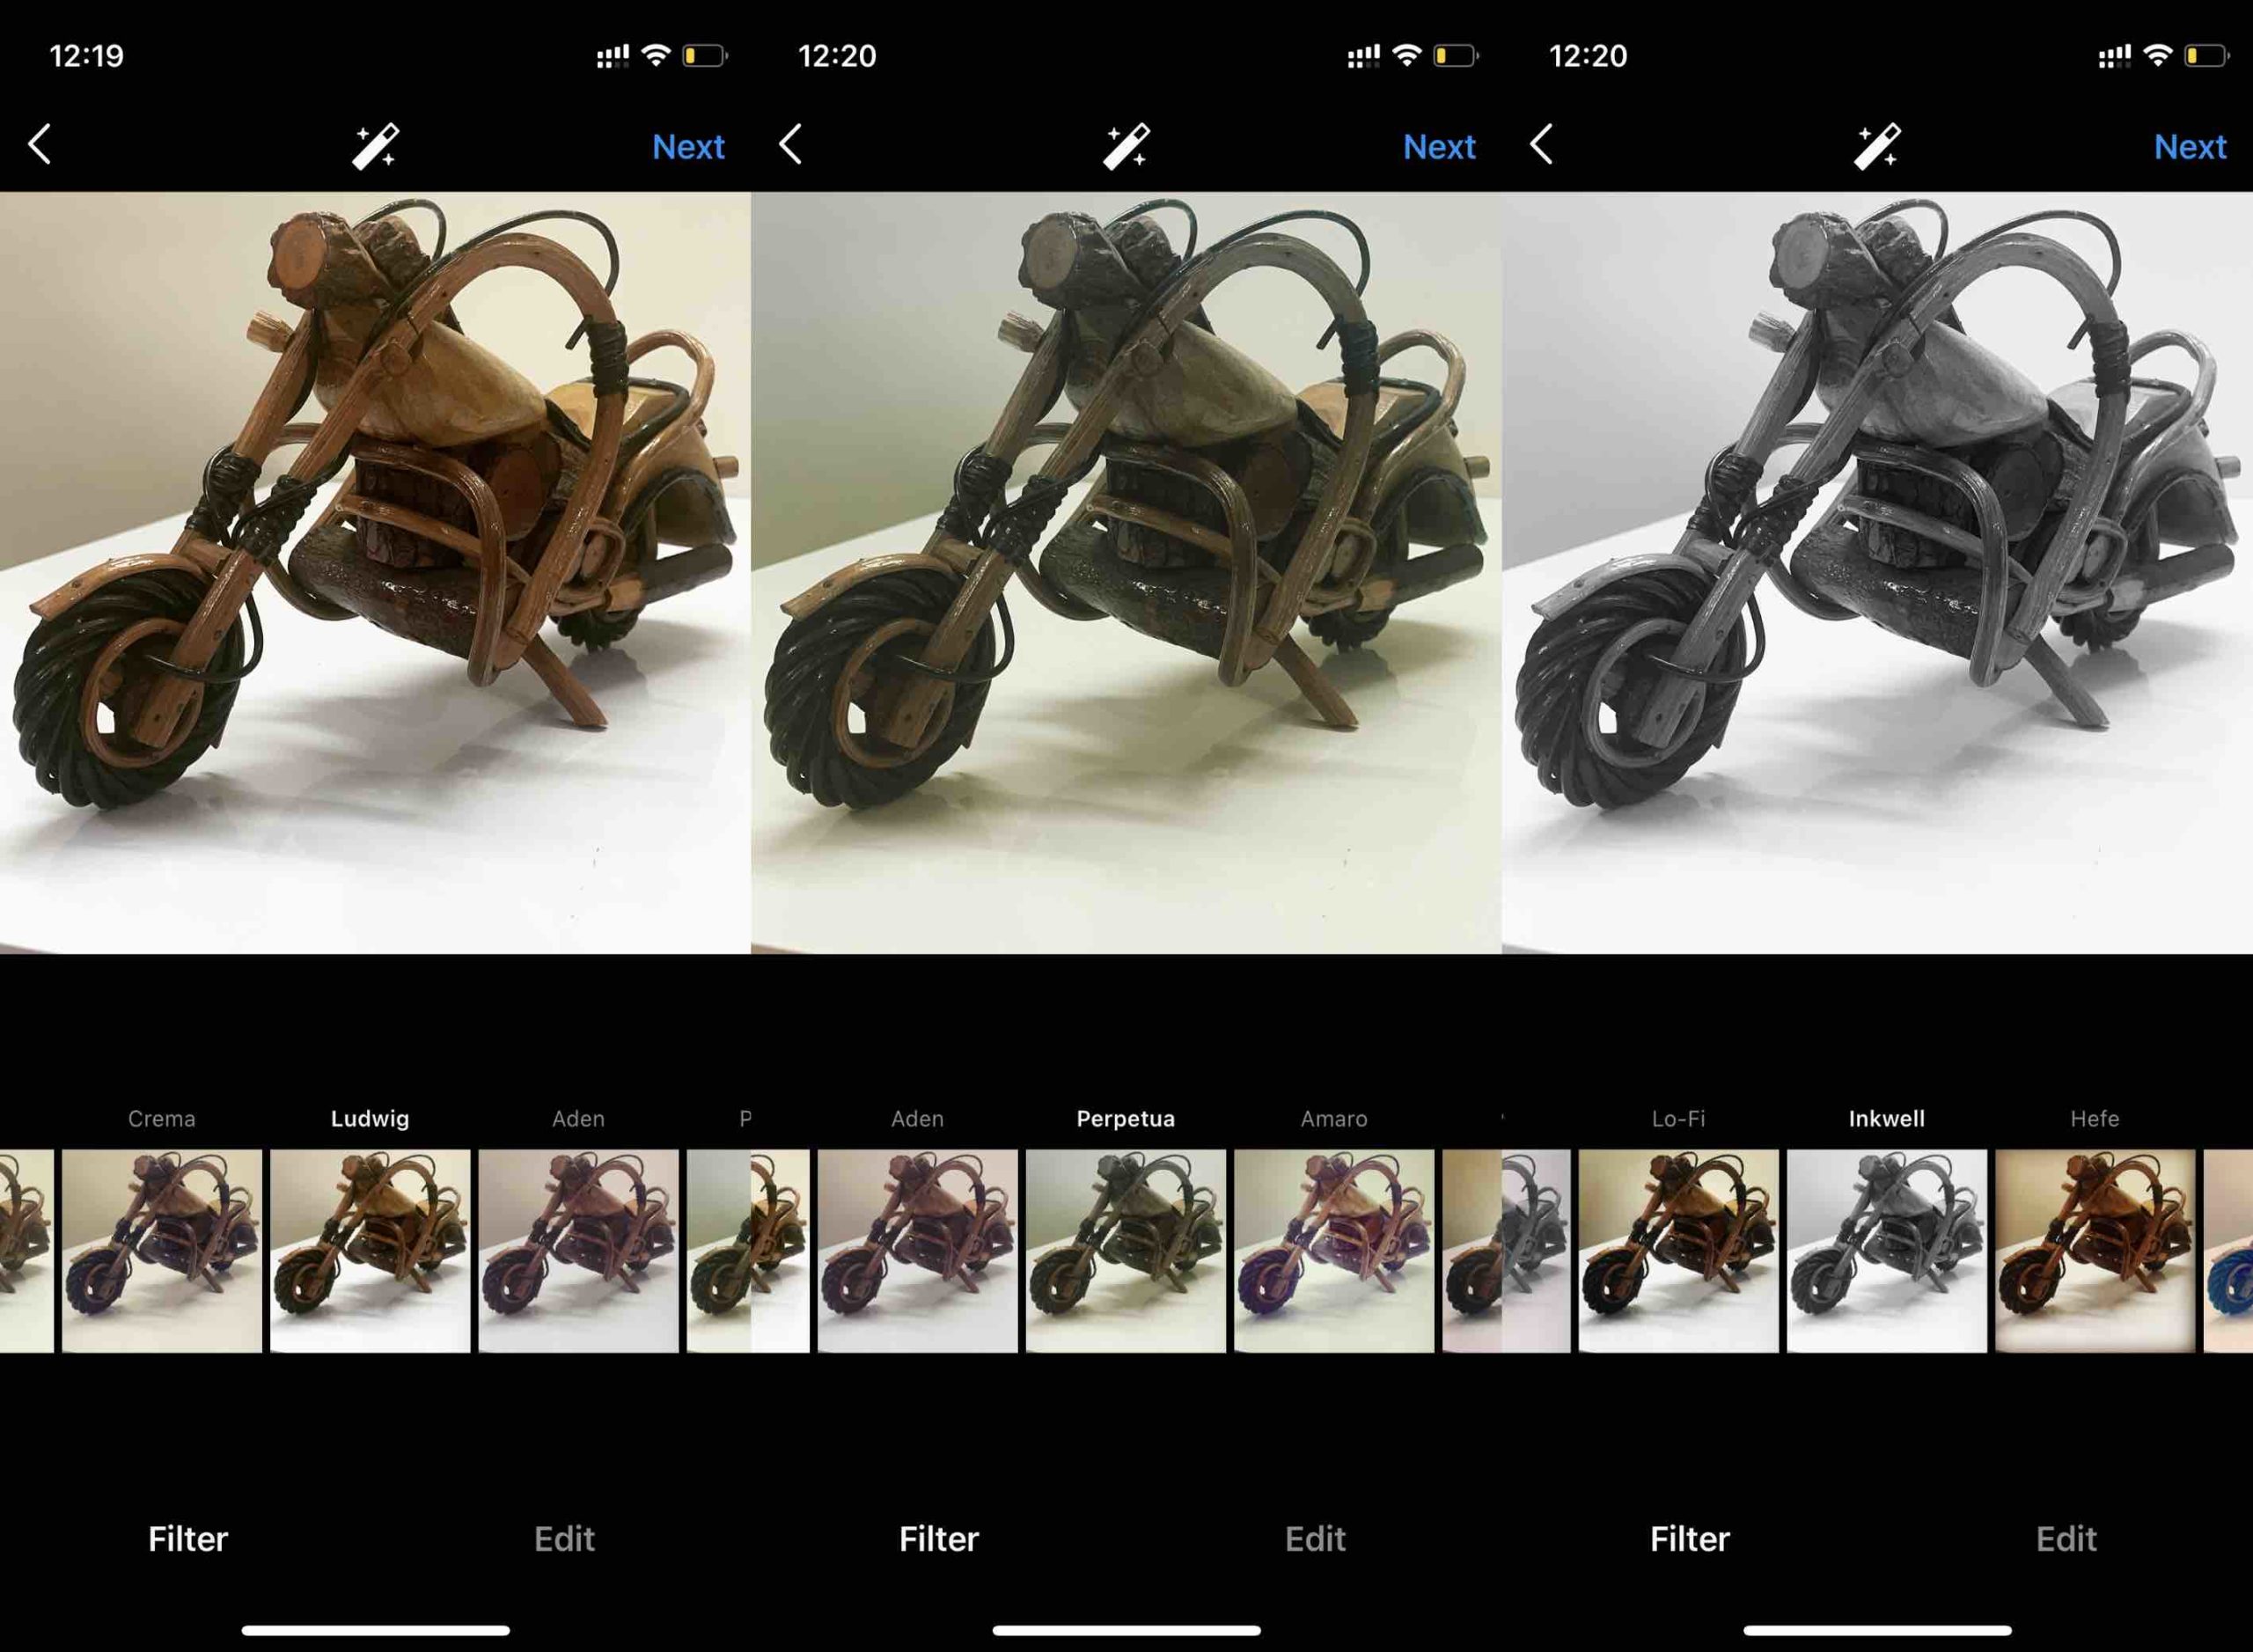
The number of filters may be limited but you can make the most out of them if you choose the right ones. Filters like Lark and Ludwig are good if you want to bring out the finer details in an image. If you like the mint-green tinted polaroid camera photos, Perpetua is the filter for you. Should you choose to go monochrome, I’d say go with Inkwell for details or Willow for overall even filter.
How To Use Instagram Effects?
Let's get to the more modern AR effects now. You can use Instagram effects on your stories, reels, IGTV, and live videos. You can also use them in your Instagram posts if you take a photo or video with effects, save it to your phone, and upload it as a new post. Here is how Instagram effects.
Open Instagram to take a story
Open the Instagram app and tap on the '+' button on the bottom, or swipe right from anywhere on the app. Below the shutter button, tap on 'Story' and you'll see effects on the right side of the shutter (capture) button.
Explore Instagram Effects
You can explore effects before you capture a story, so explore before you click. To do so, keep swiping left from the shutter button and you'll see the effects applying to your camera in real-time.
Browse Effects
If you can't find the perfect effect, keep swiping right to the end of effects till you see the 'Browse effects' tab. Tap it and you can discover more Instagram effects. You can also create your own effects using tools like Spark AR.
Less than a month after Apple’s A14 Bionic-fitted iPhone 12 made it to the market, the Qualcomm Snapdragon 888 5G is here to compete. While the iPhone has its own proprietary chips, most Android phone-makers go with a Qualcomm or a MediaTek SoC. In short, we now get to write about Qualcomm Snapdragon 888 vs. Apple A14 Bionic and compare the latest iPhone with the upcoming Android devices.
Qualcomm Snapdragon 888 5G Vs. Apple A14 Bionic
Image: Qualcomm
Let’s get started with an outline of what’s going on. On the first day of the Snapdragon Tech Summit Digital, Qualcomm unleashed its latest Snapdragon 888 SoC. The chip is the latest in the Snapdragon 8-series, which are flagship processors from the Chinese chip-giant. It’s not just 5G-ready but comes with an integrated X60 5G modem-RF system.
While the company is tight-lipped about all the specifications, some of the details were announced in the keynote. The Snapdragon 888 5G has a new 6th Gen AI engine, running on the re-engineered Qualcomm Hexagon processor. The company also announced that the chip features a “significant upgrade” to the Adreno GPU. The chip sees improvements in the photography area, with a beefed-up Qualcomm Spectra ISP that can capture photos and videos at 2.7 gigapixels per second or roughly 120 photos at 12MP resolution.
On the Apple side of the ring, we have its first 5G-ready heavyweight, the Apple A14 Bionic. Based on a 5nm design, the chip came with crazy benchmark results and tossed the current standing Android flagships out the window. Apple called it the fastest chip on a smartphone. In terms of image processing, the SoC enables the iPhone 12 lineup to shoot in Dolby Vision.
SD888 Crushes A14 Bionic In 5G
Image: Apple
While Qualcomm has reported significant gains in all segments when it comes to the Snapdragon 888 5G, the 5G part stands out. We can confidently say that the chip beats Apple’s A14 Bionic in terms of battery consumption while using 5G. Now at par with the 5nm design of the Apple chip, the SD888 has an integrated 5G modem. It’s superior to Apple’s power-hungry external modem.
That said, Qualcomm has clearly left Apple behind when it comes to optimized 5G delivery. We’ll wait for the full specifications and benchmarks to compare the two, but it looks like the new Snapdragon 888 5G might give the A14 Bionic a run for its money.
It’s More Than Just Processors
When we compare Android and iOS processors, we often forget that the processors are not the only thing on the device. There’s the phone’s hardware, UI, RAM, and a lot more that adds to the user experience. For instance, Samsung phones tend to go slow over time because of the OneUI skin. It’s RAM-intensive and takes a large chunk of your phone’s memory.
Then we have stock Android devices, which are easy to use and receive faster updates and offer a snappier user experience. When it comes to iOS devices, certain apps have a better interface, the cameras have uniformity, and the device is capable of staying consistent because the software makes full use of the hardware.
So when we talk about user experience, a chip is as good as the other hardware it’s paired with. While the Qualcomm Snapdragon 888 5G certainly has some muscle to it, the end result will be in the hands of phone makers that use the chip.
Many iPhone and iPad users have complained about boot loop and black screen issues. There are several reasons behind iPhone boot loop and black screen issues. However, there are many easy methods available to fix them. You could face such problems after updating to the latest iOS 14 or restoring your iPhone. If you’re searching for the solutions for these issues, you can visit an Apple service center but there everyone is aware of Apple’s repair costs and you might have to submit your iPhone for repair which could take a day or two. Before visiting an Apple store, here are some simple yet effective troubleshooting tips you can use to get rid of iPhone boot loop and iPhone black screen.
In case these tips aren’t helpful (we’re hopeful, these will be), your last resort would be consulting an Apple technician for the issue affecting your device.
Fix iPhone Boot Loop & iPhone Black Screen: Basic Troubleshooting
Force Restart Your iPhone
The first step towards fixing an iPhone stuck on Apple logo is force restart it. Here’s how you do it:
If you have an iPhone 6 or earlier, press the power button and home button together until you see the display go off.
For iPhone 7 or 7 Plus, press the power button and volume down button simultaneously and do not release the button until you see the Apple logo.
If you own iPhone 8 or above, press and release the power up down and do the same with the power down button. Once you see the Apple logo, press the power button.
Use iTunes To Restore If iPhone Keeps Restarting
Another method to break out of iPhone boot loop is using iTunes to restore it. Here’s how you can fix the iPhone black screen issue:
Before using this method, we must tell you that you will lose your data in the process. Therefore, if you have not backed up your iPhone, we don’t recommend using this method to get rid of iPhone error 4013. If you have recently backed up your data on iCloud, you can go through with this method without worrying much about your personal and valuable data.
Connect your iPhone to your PC using the USB to lightning cable and then launch iTunes. Make sure that iTunes is updated to the latest version before you proceed.
Go to the ‘Backups’ section and click on the ‘Restore Backup’ button. You’ll be presented with a list of your previous iPhone backups. Choose the backup from which you want to restore the data to your iPhone.
Once the backup is restored, you’ll see that the you won’t be stuck in boot loop anymore.
Use Recovery Mode to fix iPhone Black Screen
You can also use iPhone’s recovery mode using iTunes to fix an iPhone stuck on Apple logo. Follow the below mentioned steps for the same:
Please note that your entire data will be deleted in the process. Therefore, we recommend users to take a backup on iCloud before proceeding with this method to fix iPhone.
Connect your iPhone to your PC using the USB to lightning cable and then launch iTunes. Make sure that iTunes is updated to the latest version before you proceed.
Press and hold home or power button on your iPhone for a few seconds until you see the recovery mode screen. When you see the recovery mode screen, release the button and click on Update iPhone. The PC connected to your iPhone will start installing the latest iOS to solve the issue.
Use Dr.fone System Repair To Fix iPhone Stuck In Boot Loop Without Losing Data [Recommended Method]
While all the above-mentioned methods involve a risk of data loss, there is another safe method that we recommend to our users. You can use Wondershare’s Dr.fone System Repair (iOS System Recovery) to fix your problematic iPhone. It is compatible with the latest iOS 14 as well as previous versions of iOS. Moreover, you can download the Dr.fone app for Windows and macOS.
Here are the steps you need to follow:
Download the software from the official website according to your operating system. Install and launch it, and choose ‘System Repair’ option. Connect your iPhone to the PC using USB cable.
Here, you’ll see two options – Standard Mode and Advanced Mode. Choose the Standard Mode to get rid of iPhone black screen without losing your data.
If the software fails to recognize your device, you need to click on “Device is connected but not recognized” and reboot it on the DFU (Device Firmware Update) mode as the on-screen instructions show. To enter the DFU mode, hold the Power and Home button at the same time for 10 seconds. Now, release the Power button (and not the Home button). As soon as your device will enter the DFU mode, the application will automatically recognize it.
Next, choose your iPhone model and the correct iOS version to download the firmware. After choosing the correct options, click on the Start button to start downloading the firmware.
The download procedure will take some time. Until the firmware download is complete, make sure that your iPhone is connected to the PC and you have a stable internet connection.
Once the firmware is downloaded, click on the ‘Fix now’ button to fix all your iPhone related issues including iPhone black screen, error 4013, iPhone stuck on Apple logo, and more.
After the procedure has been completed, you’ll get a message on your PC saying “Repair of the operating system is complete”. Your iPhone will automatically reboot.
In case the issue is not resolved, you can click on the ‘Try Again’ button to repeat the procedure once again.